View Builder: Visit Model
The View Builder page is intended for administrators who would like to build custom views for their organization.
To build views based on visit data, select Visit Model option from under the View Builder.
This action displays the View Builder page. If any custom views have been created, they are dis- played in a grid. The information on this screen includes:
- View name,
- User, which specifies the user who created the view,
- Date Created, and
- Module, namely which module the view is listed under, on the Home
View Builder: Existing Views

View Builder: Add new view

Visit Model: Creating a View
To create a custom view, click the Add New View button at the bottom of the grid.
The Add View page is displayed. There are several details that can be added via this page:
• View Info
- View Name* - please note: apostrophes and special characters are not allowed in this field,
- Description - please note: apostrophes and special characters are not allowed in this field,
- Module, where you can select the Module and Submodule on the
Home page where the view will be listed under when created,
- Publish, which specifies whether the view can be published or not. If checked, the view is visible to other users with the same rights. If unchecked, the view is not published and cannot be seen by other users.
- Columns - you can select the columns which go into the To select a column, check the Is Selected checkbox.
- View Columns - You can check one or more of the following checkboxes (if ungrayed):
- Is Selected - check this is the column is to be added to the view,
- Filter - check this if you would like the column's data to be available in the Reports Filter section of the view. Available only for certain text-based fields,
- Total - check this if you would like the column's data to be totaled and displayed as a separate line item at the bottom of the grid. Available only for certain numeric fields,
- Average - check this if you would like the column's data to be averaged and displayed as a separate line item at the bottom of the Available only for certain numeric fields.
- View Builder allows you to create columns based on formulas you provide. This feature can be used for calculating numeric or date-based
*- Required
When you are done with selecting view columns or setting up calculated columns, click on the:
- Submit button to save your changes,
- Update and Sort button to save your changes and re-order your columns,
- Cancel button to discard any
Calculated Columns: Creating a Date Type Calculation Column
To create a calculated date column, you can specify the following details:
- Calculation Type* - select from either Date or Number,
- Column Name*,
- Has Totals - check this is the column should also have a Totals row displayed at the bottom of the grid,
- Has Averages - check this is the column should also have an Averages row displayed at the bottom of the grid,
- From Date - specify the date here that is End Date, i.e. the date from which the To Date
is to be subtracted from,
- To Date - specify the date here that is End Date date, e. the date that is being subtracted from the From Date,
- Display in - select one of Days, Hours, or Minutes to specify the units that the difference must be specified in.
When you are done with selecting columns or setting up calculated columns, click on the Add button to add the column to your view. Once the column is saved, it can be edited or deleted.
Visit Model: Adding a Date calculated column

Calculated Columns: Editing a Date Type Calculation Column
To edit a calculated date column, you can click the Edit (Pencil) icon next to it. You can change details including:
- Calculation Type* - select from either Date or Number,
- Column Name*,
- Has Totals - check this is the column should also have a Totals row displayed at the bottom of the grid,
- Has Averages - check this is the column should also have an Averages row displayed at the bottom of the grid,
- From Date - specify the date here that is End Date, i.e. the date from which the To Date
is to be subtracted from,
- To Date - specify the date here that is End Date date, e. the date that is being subtracted from the From Date,
- Display in - select one of Days, Hours, or Minutes to specify the units that the difference must be specified in.
When you are done with selecting columns or setting up calculated columns, click on the Update button to save your changes to the column.
Visit Model: Editing a Date calculated column

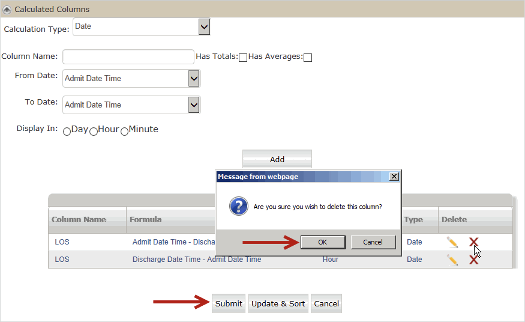
Calculated Columns: Deleting a Date Calculation Column
To delete a calculated column, you can click the Delete (Red X) icon next to it. RAPID displays a question asking, "Are you sure you wish to delete this column?" Click on:
- OK to delete the column, or
- Cancel to leave the calculated column as-is.
Calculated Columns: Creating a Numeric Calculation Column
To create a calculated numeric column, you can specify the following details:
- Calculation Type* - select from either Date or Number,
• Column Name*,
- Has Totals - check this is the column should also have a Totals row displayed at the bottom of the grid,
- Has Averages - check this is the column should also have an Averages row displayed at the bottom of the grid,
- Select - select a pre-existing column to base your calculation off of,
- Formula - select mathematical symbols to the left of this text area to build your mathematical formula. If there are mistakes in the formula you entered, RAPID flags it with an "Invalid Formula" message,
- Digits After Decimal - you can set precision up to 4 places after the decimal by selecting an entry from this dropdown.
- Is Currency - If selected, the number will be displayed in the view with a $ sign preceding the number.
When you are done with selecting columns or setting up calculated columns, click on the Add button to add the column to your view.


Calculated Columns: Editing a Numeric Calculation Column
To edit a calculated date column, you can click the Edit (Pencil) icon next to it. You can change details including:
- Calculation Type* - select from either Date or Number,
• Column Name*,
- Has Totals - check this is the column should also have a Totals row displayed at the bottom of the grid,
- Has Averages - check this is the column should also have an Averages row displayed at the bottom of the grid,
- Select - select a pre-existing column to base your calculation off of,
- Formula - select mathematical symbols to the left of this text area to build your mathematical formula. If there are mistakes in the formula you entered, RAPID flags it with an "Invalid Formula" message,
- Digits After Decimal - you can set precision up to 4 places after the decimal by selecting an entry from this dropdown.
- Is Currency - If selected, the number will be displayed in the view with a $ sign preceding the number.
When you are done with selecting columns or setting up calculated columns, click on the Update
button to save your changes to the column.
Calculated Columns: Deleting a Numeric Calculation Column
To delete a calculated column, you can click the Delete (Red X) icon next to it. RAPID displays a question asking, "Are you sure you wish to delete this column?" Click on:
- OK to delete the column, or
- Cancel to leave the calculated column as-is.
Visit Model: Editing a View
To edit an existing custom view, click on the View Name link from the grid.
The Edit View page is displayed. You can change the following details on this page:
• View Info
• View Name,
• Description,
- Module, where you can select the Module and Submodule on the
Home page where the view will be listed under when created,
- Publish, which specifies whether the view is published or not. If checked, the view is visible to other users with the same rights. If unchecked, the view is not published and cannot be seen by other users.
- Columns - you can select the columns which go into the To select a column, check the Is Selected checkbox.
- View Columns - You can check one or more of the following checkboxes (if ungrayed):
- Is Selected - check this is the column is to be added to the view,
- Filter - check this if you would like the column's data to be available in the Reports Filter section of the view. Available only for certain text-based fields,
- Total - check this if you would like the column's data to be totaled and displayed as a separate line item at the bottom of the grid. Available only for certain numeric fields,
- Average - check this if you would like the column's data to be averaged and displayed as a separate line item at the bottom of the Available only for certain numeric fields.
- Calculated Columns - View Builder allows you to create, modify and delete columns based on formulas you provide. This feature can be used for calculating numeric or date-based calculations. Please refer to Section 2.18.1.1, “Calculated Columns” on page 98 for a full discussion on how to work with calculated columns.
When you are done with editing columns or setting up calculated columns, click on the:
- Submit button to save your changes,
- Update and Sort button to save your changes and re-order your columns,
- Cancel button to discard any changes